

There they were. Dozens of bobbing boats. Striking reds to canary yellows. Their hulls glistening from the wet shine of the water. Then, hours later, they were laid over on their side in the dismal mud. Looking more dismal themselves because of it. This happened twice a day and took our breath away.

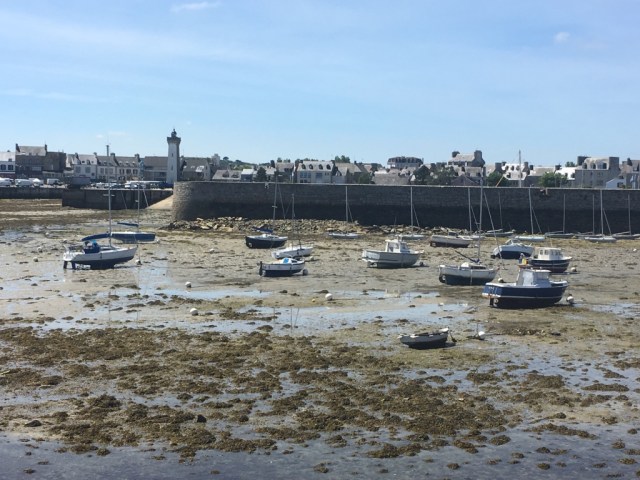
But what do I know about these seemingly disheveled boats? They must have been in shipshape! Friends, we were in Roscoff! Captain Yannick’s village back in France that we sailed to across the Atlantic Ocean from Pensacola last summer.

These photos were literally from our first few hours in France. A couple of wide-eyed ocean-crossers wandering the cobblestone streets!


And, we had the perfect built-in tour guide. Yannick himself, who took us around, showed us the fantastic, ancient churches in the downtown square, the cobblestoned streets, the beautiful waterfronts and delicious bakeries, and the even more ancient and even more fantastic castles right next to his very own home. Yes. Castles. People live in castles in France! And, before we were off to Paris, Yannick made sure we got the very best crepes Roscoff could offer.


It was a mesmerizing, humbling visit. But one of the things Phillip and I remember most about that stunning coastal village were the tides. Breathtaking tides that rose and lowered more than twenty feet at a time, twice a day. The beautiful bay we walked along every day to go get our croissant and café, a colorful, glistening pool of boats in the morning was a brown, dry lake bed of boats in the afternoon.


I’d never seen anything like it. The rather large boats were cleated to the seawall in such a fashion that they would simply sink until their hull touched bottom and then remain fastened tight and upright to the wall. The boats on mooring balls or anchor, however, out in the bay would drop down with the tide until their hulls, too, reached the bottom and fall gently to one side or the other as the water slipped away. Many of the sailboats actually had wooden props fastened to their sides to help hold them in a more upright position. They stuck off like training wheels in the mud. Can you imagine knowing your boat was going to “run aground” (although I guess that’s technically a “lay aground”) twice a day? Other than the training wheels, how would you prepare your boat for that? I’ll tell you: By keeping her shipshape.
And what does your mind automatically spout out after that? That’s right. And Bristol fashion! But do you know why?
Friends, I had the idea to write a fun blog post for you all after we finished our varnish project this summer to share some of the lessons we learned along the way. (And of course the rewards. Yes, yes. Total boat wood porn is coming I can assure you. Be excited!) I then had the idea to call it “Shipshape and Bristol Fashion” and realized I didn’t really know the origin of the phrase. You know me. I love words, and I love to learn how phrases we commonly throw around originally came to be. For example, do you know where the phrase “wet your whistle” comes from? I’ll be honest, I always thought it was because our heads are a bit whistle-shaped, with a round bulbous head and a then a thin little neck sticking off. So, I thought wetting your “whistle” (your neck and noise-maker) would mean taking a drink. As usual, I was very wrong, but happily so. Turns out, many years ago in England, pub frequenters had a whistle baked into the rim or handle of their ceramic cups. When they needed a refill, they used the whistle to get some service.
You see? Isn’t that cool to learn? So, what about this quirky “shipshape and Bristol fashion” phrase? Phillip and I were throwing it around often during the weeks we recently spent putting many, many coats of varnish on our wood, but if I was going to write about it, I wanted to know about it. And, as a learning adventure often is, it turned out to be a very fun Aha! moment for me and a unique trip down memory lane.

The Origin of Shipshape and Bristol Fashion
Apparently over some 200 years ago, the Port of Bristol was a thriving English seaport where many large vessels came via the Bristol Channel to bring cargo to England via the Avon River. Much like Roscoff, the tidal range in the Port of Bristol was significant, rising and falling some 14 meters (45 feet) each day. Talking about having to use the Tide Tables to calculate high and low tide! Ships moored in the Port of Bristol would lay aground at low tide and, because of their keels, would fall to one side. If the cargo, goods and supplies aboard the boat were not stowed away tidily or tied down, everything tumbled and valuable cargo could be lost and spoiled. Meaning, boats that were kept tidy and in the highest standards of seamanship were considered to be “shipshape and in Bristol fashion.” I can assure you the lovely Plaintiff’s Rest isn’t quite there yet …

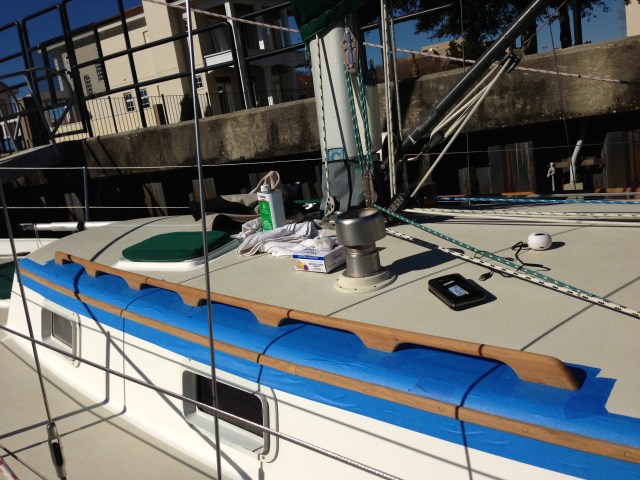
(as we are elbow-deep in boat projects this summer), but she will be! And, most importantly, her wood definitely is right now, as we just completed our varnish project for (hopefully) the next couple of years! Thankfully, our Niagara 35 doesn’t have a tremendous amount of wood. Frankly, for us, it seems the perfect amount. Just enough to give her a nice, classic sailboat accent but not enough to overwhelm us with the upkeep. And, we’re hopeful now, by using a new product this year (Awlwood) we’ll have to do even less upkeep on the varnish in years to come. For a brief HaveWind varnish history, we stripped the majority of our wood (the eyebrow, handrails, stern rail, grate, swim ladder steps, cockpit table, etc., everything but the companion way) bare back in 2013 and put 10 coats of Schooner’s Gold on it.


We lightly scuffed and threw a couple more coats on again in early 2015. However, this year, we knew it was time to scrape down to bare again on some pieces (particularly our eyebrow which had been flaking since last fall). But we said “Screw that, we’re going to Cuba instead!” Ha! And, it wasn’t a mistake. But, varnish was definitely high on the list this year. The handrails still looked very good. We had our local canvas guy (Tony with Coastal Canvas) make us some custom handrail covers back in 2015 and they have worked very well to protect and preserve the varnish on our handrails.

Our eyebrows, unfortunately, do not hold up as well because each time it rains, or the deck gets wet from spray or dew, the water eventually rolls down and sits until it evaporates on the top of the brow. That’s why our brow looked like this by the end of 2016:

That is definitely not Bristol fashion. Shame on you Plaintiff’s Rest crew!
Our stern rail also needed to be brought down to bare wood as it gets a lot of exposure on the back to spray and rain with no protection.

While we were pleased with the Schooner’s Gold we had used in 2013, Brandon with Perdido Sailor told us about a new product that he had been hearing good things about: Awlwood made by Awlgrip.

Brandon said he’d heard if applied right and enough coats, this stuff can hold up for three years before it even needs light coats in between. What did we say? Heck yeah! While wet wood on a boat is pretty, brightwork is not our favorite thing to do. So, we were excited about trying out this new product. While the application process was a bit tedious (because the product is designed to chemically bond with the wood, that’s what apparently makes it last so long), Phillip and I were very pleased with the end-product, the color, coats and glassy look and we’re optimistic that it will last as long as promised. We applied two primer coats (which had to cure 24 hours in between), two initial gloss coats (which also had to cure 24 hours in between), then an additional eight gloss coats two a day (just for good measure). We also scuffed and re-applied a few preventative coats of Schooner’s Gold on everything else (the handrails, companionway, grate and cockpit table). For now, the varnish on the entire boat is done. The wood is glassy and stunning and, on the outside at least, we’re proud to say Plaintiff’s Rest is in shipshape and Bristol fashion:


Now that the project is behind us, we’d like to share with you …. (drumroll please):
Our Lessons Learned and Top 10 Varnish Tips
1. Be a good stripper!
While we have heard there are products out there that help release old varnish from the wood, we’ve found a five-in-one scraper and some heat is the easiest method. Elbow grease is usually your best friend. But for varnish that is still really thick (like on our boat the section of the eyebrow that is protected under the dodger), I put about 15 seconds of heat on it until the varnish bubbles, then it comes right off.


2. Filling Cracks & Gouges
Unfortunately, one of the bad things about stripping with a five-in-one tool is the occasional gouge in the wood. While this didn’t happen to us often, I’ll admit to taking out a few chunks when I was heavy in the stripping. Sorry gal! But, aside from the occasional gouge, we also had a few cracks in our eyebrow and stern rail that we wanted to fill and smooth out before varnishing. We could have used wood putty but Brandon recommended just filling them with epoxy for a much heartier fix, so we did that.

I was worried at first, however, that the epoxy would show through the Awlwood because our epoxy patches were so dark, almost brownish-black. But, after nearly a dozen Awlwood coats all told, they completely blended and the wood now looks smooth and the color uniform.
3. Washing the Teak
The wood prep process for the Awlwood was, I’ll admit, a bit tedious but it should be well worth it if that stuff really sticks for three years. We had to strip the wood down completely bare and wash it.

Yes, wash the teak. And it was crazy to see how much orange came out of it. Like we were literally washing the orange oils out. And it was so sad and grey afterward, I was afraid it wouldn’t get back to that beautiful teak hue (but never fear, it did!). At Brandon’s recommendation, we used a half-gallon of ammonia with a half-gallon of water, a couple tablespoons of Cascade dishwasher detergent and a squirt of Dawn and it worked like a charm. We washed our brow and stern rail a few times scrubbing with a Scotch Brite pad against the grain of the wood.
4. Ditch the Tape!
While Phillip and I thought we were doing a great job back in 2013 carefully taping off all of our handrail bases and the eyebrow so we could varnish without leaving a drop on the deck, we wrong … so very wrong.
It was way harder (and took weeks longer) to pull and pick all the tiny little flecks of blue tape that remained after we’d finished varnishing. You can see them here around the handrail base as the tape would tear when we were pulling it off.


Now, did we make a mistake in leaving that tape out for a couple of weeks in rain and weather (which caused it to deteriorate and meld to the boat)? Yes, but the varnish, itself, that seeped onto it around the handrail bases and under the brow also caused it to adhere to the boat. And it didn’t even prevent all of the leaks onto the deck anyway. I spent many afternoons on anchor with a dental pick trying to get all of the little blue flecks and yellow varnish drops off. And, the worst part. The tape pulled chunks of white paint off of our port lights, making them look very un-Bristol like!

No more tape! Now we just paint carefully and keep a little wet tray of acetone- (or brushing liquid)-soaked Q-tips nearby while painting to catch any accidental dribbles. It’s really not that hard to not get it on the deck, or wipe it up quick if you do. We will never tape again!


5. Watch the Weather
But, even if you do, it’s going to rain. Trust me, it just is. It’s like washing your car. The minute you check the weather, decide you’re safe and get a good, wet coat on, thunderheads will start to appear. You’ll hear rumbles in the distance. And you’ll start frantically fanning or blowing on your wood hoping it will cure in time to fend off those mean little rain drops. But if, like us, you decide to put on many, many coats, there’s just a chance one time, right after you put a coat on, it’s going to rain!

“Fight back varnish! Hold the line!” we would tell it. And, two things we were pleased to see with the Awlwood: 1) the further we got into the coats, the quicker they began to dry (sometimes in just under 15 minutes), and 2) even if you did happen to get a light drizzle that left little pockmarks in your last coat, it was easy to sand down and lay another coat on.

6. Watch the Dew!
This was a bit of a new one for us. Because we’ve been doing boat projects around our somewhat normal day jobs, we were rising very early in the morning to get one coat of varnish on in the a.m., then returning in the afternoon/evening to get another coat on before nightfall. I will say, it did become a very nice routine seeing the sun rise over our girl’s stern every morning. Good morning pretty girl!

But, coming to the boat to do varnish in the early hours meant we often found our boat covered in drops of dew.

While that’s no big deal–just dry the wood and varnish–where we made a mistake was to just wipe the wood, not the entire deck. We often found then, while we were laying on a coat (and walking around the boat causing her to list from one side to the other), the rest of the drops on the deck would converge and come running down to our wet varnish in little streams leaving dried drop marks behind later. So, if you’re going to do the dew, make sure you dry the entire deck too.
7. Our Thoughts on Awlwood
As I mentioned, this was our first time using the Awlwood product. While the prep process and application guide were a bit of a headache, I’m thinking it’s going to be well worth it in the end. The first two coats we did were the primer and we could tell as we applied them how well they were truly bonding with the wood. The color immediately stayed “wet” and the primer left the visible grain of the wood behind which told me it wasn’t just coating but actually seeping deep down in.


Then the first few coats of the gloss started to bring out just a touch of shine.

But after all layers were applied the brow was just as glassy as the handrails and we could tell from a close inspection of the wood how truly thick the Awlwood varnish on her really is. I don’t think we’ll have water intrusion, even on the top of the brow, for a very long time!

Another nice benefit of the Awlwood product Phillip has told me is that if you get a nick in the varnish later (say something hits the brow and knocks a chuck out down to the wood), unlike Schooner’s varnish you can fill the nick with Awlwood gloss and essentially “varnish it away” without having to go down to all bare wood again. This is because the primer remains bonded with the wood, so only the gloss coats can be chipped and they can also be repaired without having to go through the entire process again. That’s pretty cool!
8. Don’t Sweat the Small Stuff
At least don’t sweat it out doing it outside … if you don’t have to. If you have a home, condo, garage, shed, etc. where you can set up all the portables to do coats inside, that makes it so much nicer than sweating it out doing in the hot sun on the boat. It also allows you to get more coats on after sunlit hours or when it’s raining or wet outside.
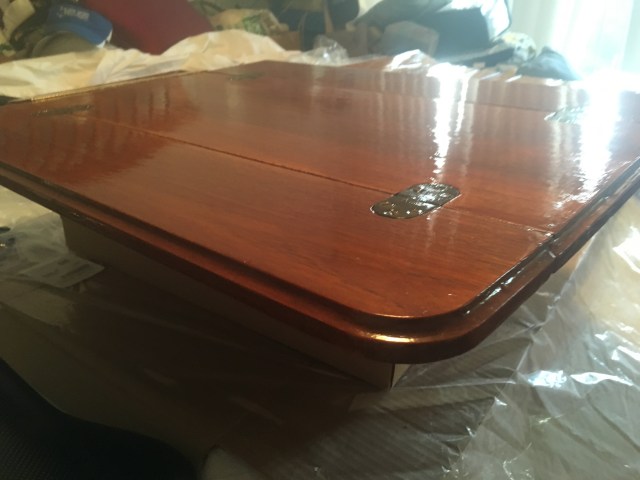

Man look at the mirror shine on the table! You can literally read the Schooner’s can in the varnish!

Sorry … I get a little excited about wet wood! ; )
One thing we do NOT paint inside anymore, though? Is these!

Our stinking swim step ladders! Why? Because we decided to …
9. Get a Little Plasteak With It
I know, I know. We’re supposed to be purists, mostly. While we do love the wood on our boat and are happy to do a little varnish work every few years to keep it looking its utmost Bristol-ey, these guys were just “Killing us Smalls!” As you all know, we have a boat for a reason. We love the water. We love to sail. We love to kite-surf. And, we love to swim. Which means our swim ladder spends a good bit of time in the water when we’re out on the hook. And we found, even when we stripped these down bare and slapped something like 12 coats of Schooner’s on, that within just 6 months (only 6?!), they were already starting to flake and turn yellow. Phillip and I finally said “screw it” and ordered up some Plasteak steps for the swim ladder last fall.


They look totally fine next to the varnish on the stern rail and we have never regretted the decision. Our steps still look absolutely brand new going on about a year and a half now.
9. “I’d Do Ten”
And you have to say that in a “Brandon voice” — all gruff and scratchy. We love that guy.

Ironically, speaking of Roscoff, that was an open-mouth selfie (Yannick’s favorite) that we took to send to Yannick in Nice, France.
And, we’ve been saying that for years. Anytime the number ten comes up in conversation, Phillip and I cock our head back and blurt it out: “I’d do ten.” Why? Because that’s what Brandon told us waaaaay back (he’s been with us from the start) in 2013 when we were just starting our very first varnish project. Phillip and I were ordering up our Schooner’s, researching application methods, etc., having no idea entirely how big the project was going to be or how many coats we would put on. I’m sure we were both thinking something like three to five. Then we asked Brandon and, after a thoughtful pause, he said “I’d do ten.”

I’m sure that’s what Phillip and I both looked like. Ten?! Are you for freaking real?? But, he most definitely was. And, so that’s how many we did the first time. And this time, we really kind of did 12 because we did two primer coats and then an additional 10 coats of gloss. But, what we learned in varnishing is that the prep work is really the hardest part. Once the wood is ready, slapping the coats on is nothing. Sometimes it only takes a quick, rewarding 15 minutes at the boat. And, if you’re going to take the time to prep the wood, why not spend just another couple of days putting ten coats on as opposed to just six or seven. You’ll be glad you did two years later when your varnish is still Bristol and banging! At least that’s our mantra. Plaintiff’s Rest’s wood is most definitely in shipshape and Bristol fashion now and we’re expecting her to stay that way for a couple of years at least. Hope these varnish tips have helped. Happy Painting Peeps!

