
Or how we rig it on OUR BOAT, I should say. Ahoy followers! You ready for a little virtual sailing lesson? That’s right, float away from your desk for a minute, imagine yourself on the sunny deck of a gently-swaying boat, looking out over green, glistening water. Can you smell the salt in the air? I hope so! But, there’s only one thing that’s bugging you: that occasional luff-crumple-pop of the headsail. The light winds over the stern combined with a kicked-up sea state is causing your easy downwind run to be much more of a strain on your headsail than you would like. Every third wave, she luffs, curls, and then snaps back out with a vicious pop when she fills again. I know you’re cringing right now hearing it. So, what do you do?
Rig a whisker pole!

We’re going to share with you today a detailed step-by-step process, with photos, of our whisker-rigging method as well as some tricks and very important lessons we learned when first working with and learning how to rig the whisker pole on our boat while we were cruising in the Bahamas, namely the following:
- Where to attach the outer end of the pole (the Pam Wall Rule).
- What else to attach to the pole (the Captain Frazer Rule).
- And, where to attach the pole first (the HaveWind Rule).
All lessons are free today. Feel free to learn some at our expense!
No one likes to hear a sail pop and flail. I always feel like it’s a dog yapping and running around in circles because thunder scared him. You just want to hold him close and calm him down. Yes, I would do that with our sails if I could. In a heartbeat. But, unfortunately, I can’t. Trust me, I’ve tried. Our jib just kicked and squirmed and whacked me solid across the face. Thanks Wendy. Don’t try to be a human whisker pole. Be smarter than me.
As I mentioned in the spinnaker trainer video I shared in our spinnaker video last week and in our Bahamas Boat Project Recap, for Phillip and I, getting our whisker pole functioning and learning how to safely and comfortably rig it ourselves underway, was one of our big “sail plan” goals last year while we were preparing for our trip to the Bahamas. Our sail to Cuba in 2016—bashing for days into strong head winds—taught us many things. One was that we needed to expand our sail plan and hone our sail skills to have more options to keep our boat and the crew sailing safely and more comfortably in a variety of wind speeds and directions. Mastering the whisker pole was a key factor in that.
If you recall, in our Bahamas Boat Project Recap, I talked about what we had to do to get our whisker pole ready for cruising. While she came with the boat, and rode with us idly for many years in two handy little stanchion post brackets on the starboard side near the bow, we had not actually used our whisker pole for years because she had a glitch. She had a rather significant dent that prevented us from being able to slide the extension out to make it long enough to actually reach the sheet of the sail. This meant for years we were lazy and just didn’t use her. Bad sailors! You can say the same thing about us with the spinnaker. We didn’t bust ours out on the boat for years just because we thought she would be big and cumbersome and we might rip her during the launch or douse. Again, bad sailors! Why would you skip out on allll this awesomeness over fear of failure!

We’ve since learned you have to just get out there and try stuff. If you’re afraid you might damage a system because you don’t know exactly how it works, then ask a more experienced sailor to come out on a sail with you (offer beer or other booze and snacks, of course) and figure it out. Yeah, you might break something, or find something was on the verge of breaking anyway, but it would be better to break it or find our it was about to in the comfort of your home waters, not while underway across the Gulf or some other blue-water body, am I right? As a good friend of ours often says (Tom, if you’re reading this), when the sailing gets boring, he smacks his hands together and says: “Time to break some shit!” It is a saying Phillip and I have readily adopted on our boat, hand-clap and all.
You can’t be afraid to try something out just because you might break it. And, I can say all of that lofty inspirational stuff now because Phillip and I were pansies for years and did not fly our spinnaker or use our whisker pole simply because we didn’t quite know how and didn’t take the time to figure them out, get them working, and get ourselves used to using them. Shame on us, I know! But, that’s why I can boldly write this post, because we have since done just that and I’m proud to share.
Now, the dent in our whisker pole. That was a fun story. Phillip had the idea for me (and specifically me, specifically in spandex) to take our dented pole to an auto body shop to see if they could work the dent out (much like they do on vehicles) to get the pole’s extension capabilities functioning again. And while I had every intention of paying them for their work, the guys had such a great time ribbing each other and working on this “oddball boat thing” they called it, seeing who could work the ding out the best, while I watched in spandex, that they just did it for free. I tried and offered repeatedly to pay, but the owner, Travis, said it was such a fun show to watch, he was happy to help a local for free. So, many thanks again to the great guys at Coastal Body Works here in Pensacola for getting these sailors up and going again!

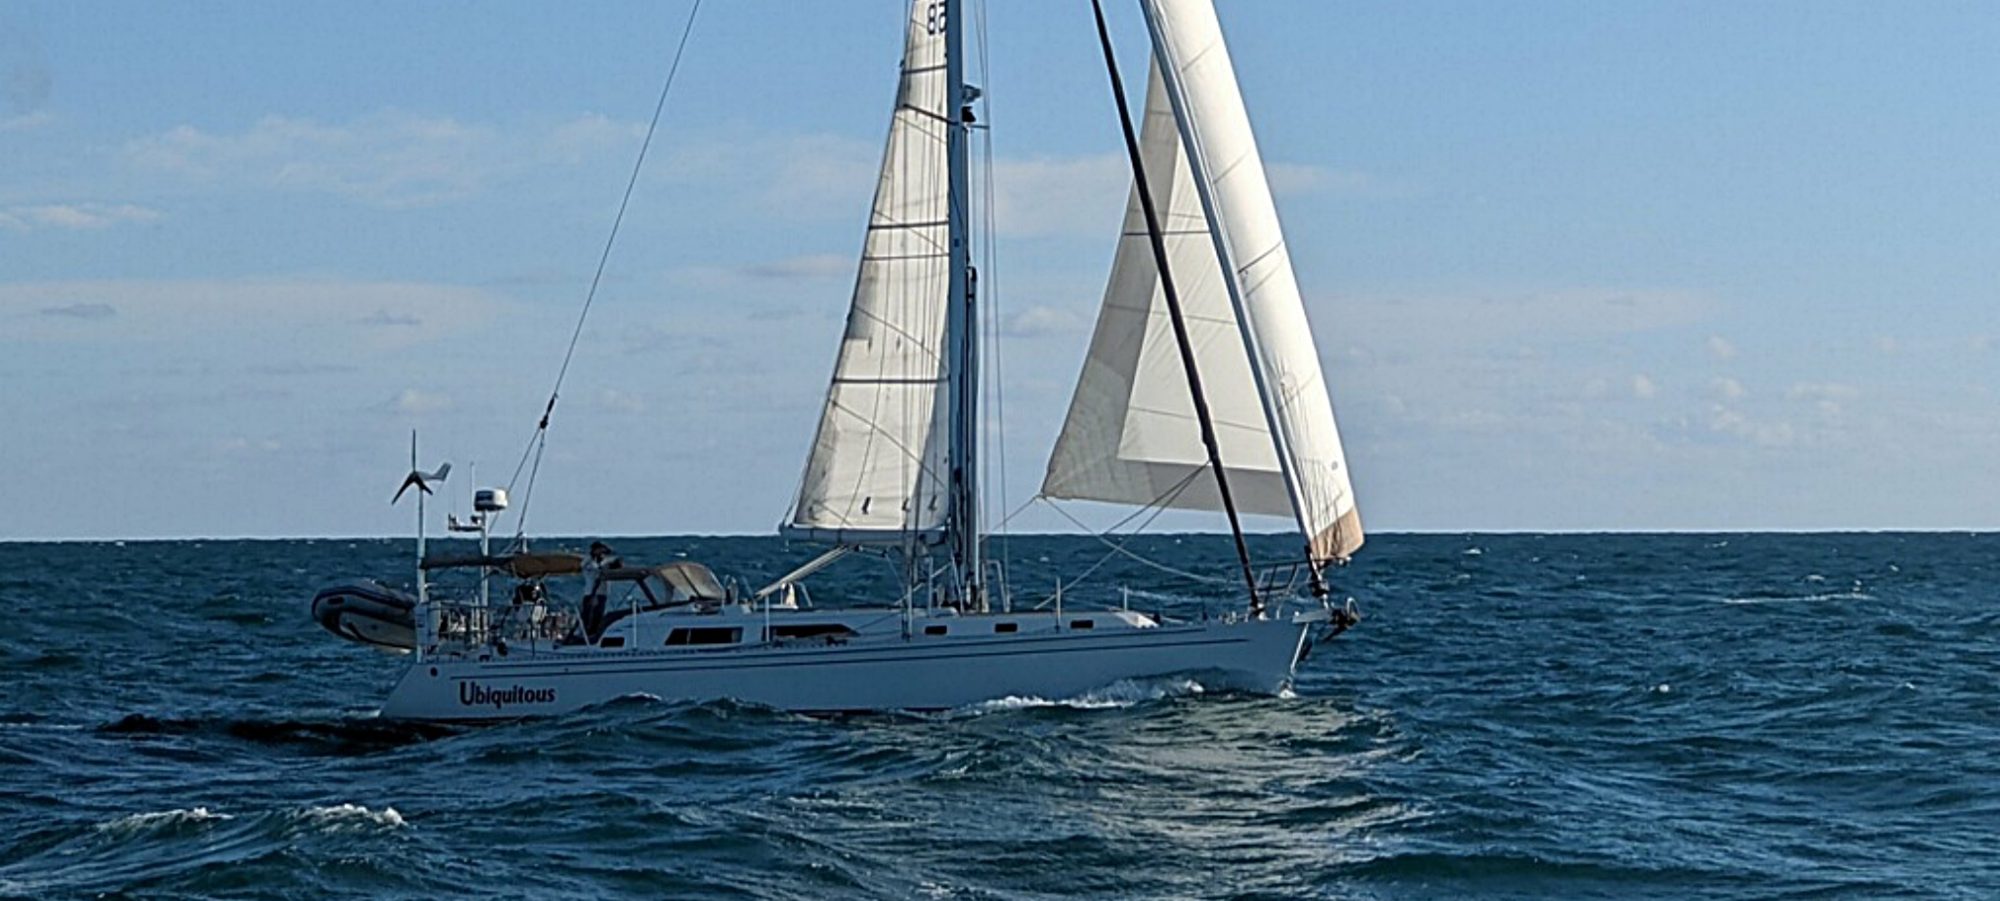
Once we had the whisker pole working, we then started to toodle around with it on the boat and found that while a whisker pole can be very useful in light winds where it’s not quite enough to keep the headsail full or not the right angle for you to fly the spinnaker, what we learned during many of our downwind sails during our time in the Bahamas, was that it can also be useful when there is enough wind for your headsail, but a churned-up sea state, and accompanying erratic movement of the boat, keeps causing the sail to cave, crumple, and snap back with a bang. Not cool. This was one of our biggest “aha!” moments with our whisker pole. You can see in this photo the sail is luffing and will soon snap back once the boat tips and it fills with wind.

As we all know, luffing and popping is not good for the sail. And we had some decent wind here in this photo. I believe it was blowing around 8-9 kts, plenty to keep the sail full … in smooth seas, but not enough to keep her taut when the boat is bucking around in churned-up 2-3 footers. What Phillip and I did not know, initially, was that the whisker pole was something we could not only use to get more wind in the sail on a light-wind downwind run, but also something that could prevent luffing and popping in kicked-up seas. Very cool.
And once you rig it in some funky seas, you’ll find the boat rides smoother. The crew is more comfortable not having to listen to that occasional crumple and bang. And, the boat is infinitely grateful for the more comfortable set-up. Having made several mistakes in the beginning (don’t we all?) Phillip and I learned a few helpful tricks that allow us to easily rig the pole in most conditions and to even furl up the headsail quickly without having to un-rig the pole. Pretty cool, huh? Now, I will be the first to admit most of these very cool tricks were learned at the hands of other, more experienced, sailors: friends and mentors who have many (many!) more blue-water miles under their belts than we do, and from whom we love to learn. So, a big thanks in advance to the ever-amazing Pam Wall and our fellow Captain and friend in Marathon, Captain Russell Frazer, and his exceptionally-skilled wife, Lynn, for sharing some of these tips with us.
Our Three Biggest Whisker Pole Lessons
- Attach the pole to the sheet, NOT the clew of the sail (The Pam Wall Rule)
- Rig preventers fore and aft (The Capt. Frazer Rule)
- Attach the pole to the sheet first, THEN the mast (The HaveWind Rule)
The Pam Wall Rule: Attach the pole to the sheet NOT the sail
I actually recall when we were speaking with Pam about this. It was during a work/play trip to Ft. Lauderdale. Sometime in the spring of 2016, I believe. And she and Phillip got to talking about this whisker thing on the boat. I wasn’t really sure what they were talking about, but I always hate to interrupt because of my own confusion (because it’s so frequent) so I did what I often do in a situation like that. Pretend and nod and try to say stuff that won’t expose my ignorance. I remember Pam mentioning some sail training video she had been involved with but when she saw the final product, and the “whisker pole was attached to the clew! The clew?!” (she shouted) she told the production company she did not want her name anywhere near it, because that was not right.
Now, did Pam’s comment make sense to you? Me, I had no clew, pun intended. At the time, that is. I’ll be the first to admit how much more I still have to learn about sailing, but I have come leaps and bounds since my first few years with Phillip and, thankfully, that makes sense to me … now. Phillip, who knew immediately what Pam was talking about then and who fervently agreed, won her salty, sailing heart over right then and there. Pam’s a sucker for a good sailor. Sorry, Pam, the word is out. But, it didn’t come full circle for me until Phillip and I began rigging up our own pole on our boat and I then realized why attaching the pole to the CLEW was just about the worst thing you could do.
Imagine if, for some reason, somehow, someway, that pole got unclipped from the mast. Because that never happens on boats, right? Something that was once fastened becomes unfastened? It could get whacked, cracked, loosened, a number of freak things that happen often underseas on a pitching, yawing boat. Now think what would happen if that pole came unattached at the mast and it was attached not to the genny sheet, but to the clew of your sail. Do you see it? A huge pole being flailed and clanged and beat around on the front of your boat? It’s like the genny is a big ring master and the pole at the end of her sail is like a big metal bullwhip. She’s slashing and snapping just for the fun of it! And, how do you get that pole secure? Without getting knocked unconscious first? The answer is: you may not. Finding your headsail with the leeway to sling and bang that thing around however she would like is not a situation you want to be in. While there may be a bang or two if the pole comes unattached at the mast and is attached only to the sheet, eventually the pole will likely settle to a fairly-secure place on deck or get tossed overboard and remain hanging from the sheet into the water. Which outcome would you prefer to find yourself in? The bullwhip or the dangler?
Now that the “clue” makes sense to you, take a very good lesson from Pam and apply it on your own boat: NEVER ATTACH THE POLE TO THE SAIL, ATTACH IT TO THE SHEET.
Thank you Pam. Moving on.
The Captain Frazer Rule: Rig preventers fore and aft
While Phillip and I had thought about rigging a preventer forward, to the bow, and did that on our own initiative the first few times we used the whisker pole, we did not rig one aft. The preventer we ran to the bow was primarily needed, in our opinion, to prevent the pole from flying back and banging the shrouds. We put waaaaayyy too much work into those shrouds when we re-did the rigging (from rod to wire) in 2016 to have anything slam into them. Protect those shrouds people! But, we had not yet run one aft, until we talked to a good friend of mine, Captain Russell Frazer and his wife, Lynn, who are both very experienced fellow sailors in Marathon, about our travels when we returned from the Bahamas back in March of this year. Russell suggested running preventers both forward and aft so that you can roll the headsail up while still leaving the pole and its rigging in place.
This is another situation where rigging the pole to the sheet not the clew of the sail proves, once again, useful. If the pole is attached only to the sheet, the sheet will then run smoothly through the mouth of the pole, allowing you to furl the sail up while the pole—held fast with the topping lift and two preventers—remains firmly in place for you to deal with at a safer time. Imagine something crazy happened on deck (because that’s always possible), the seas kicked up and some metal piece flew off and put a nice rip in your headsail. You want to get it furled (if you have a furling headsail) as quickly as possible to keep the wind out of it and prevent it from ripping further, or worse, shredding entirely. If you have to go topside and un-rig the pole before you can furl the sail, you’ll have to leave your sail exposed and vulnerable while you do that, and if the seas are kicked up and things are flying around on deck, that’s not a time you want to be going topside and trying to wrestle a whisker pole anyway. Instead, if you can simply furl the sail while leaving the pole securely in place until it is safer to go disassemble the rig, that would be a much better alternative.
So, the Captain Russell Rule: rig a preventer fore and aft. And, thank Russell and his wife, Lynn, for that one!
The HaveWind Rule:
Attach the pole to the sheet first, then the mast
Boy, did it take Phillip and I a while to get this one. Granted, we probably could have done a little more research before we got out there (this was on our way across the Gulf headed down to the Bahamas, our last day on a five-day run, almost to Key West), and we are doing it all so totally wrong. Tssk tssk sailors!

We had decided to just “play around” with the whisker pole then, having not read much or watched detailed videos on the best way to rig it before just getting out there and tangling ourselves up in it. We usually choose that method, though. Part of it is kind of fun to figure it out yourself on your own boat and we would much rather be tinkering around with it hands-on, out in the sun, on the boat, than watching a video at home. So, if it’s safe to learn OTB (on the boat), we like to do that.
But our efforts proved in vain here, as our first time trying to use the whisker pole we found ourselves struggling to keep a hold of our preventers and make everything work by attaching the pole first to the mast, then trying to finagle the swinging end of the pole, six feet away, to make it magically snag the sheet. Silly us. I know. We just hadn’t thought it all the way through yet and were still tinkering.

After some experiments, we found it was much (much!) easier to first attach the pole to the sheet. I usually do this while Phillip is holding the rest of the weight of the pole on the other side of the boat. We have our two preventers, fore and aft, attached to the end of the pole at this time, and I usually have to push the pole out only about 2-3 feet over the side of the boat to get to the sheet. We then use the pull line (I’ll call it that) that runs the length of the whisker pole and allows us to open the mouth of the pole from afar. Once the mouth of the pole is attached to the sheet (not the clew remember!), I then push the pole slowly out while keeping a hand on my preventers. You can either have these lying on the deck in preparation for cleating once the pole is up, or (if you’re really good and have them pre-marked or you’re just a much better guess of distance than I am) you can have them pre-fed under the lifelines and down to their respective cleats before you push the pole out. We haven’t got that cool … yet! Phillip then pushes the pole out its entire length while I keep a hand on the preventers and attaches it at the mast. Then voila! the pole is up and holding our headsail out in a nice open and secure position.
We have found on lumpy downwind runs, this is a great way to get a little extra oomph out of light winds and some better rest for the boat and crew as she sails much more comfortably and quietly without the sail luffing and popping during the entire passage.
So, for a quick re-cap, this is our procedure, start to finish, of how Phillip and I rig the whisker pole on our boat. As always, we welcome feedback, and hope this helps some of you bust out your own pole and start using it too!
How We Rig the Whisker Pole On Our Boat
1. Check the integrity and functionality of the pole and its pull line (the line that runs the length of the pole and is used to open the mouth of the pole from afar). Look to make sure there are no major chafe points in the line, or areas where the line looks like it might break). Make sure the mouth opens and closes easily on each end of the pole. (Fighting that thing, once the pole is out and mobile, in seas is not something you want to do). After years of no use, sitting up under the sun on our deck, we found our pull line had deteriorated and it broke clean in two the first time I pulled it (that’s why ours is wrapped around the pole in the photo here, we haven’t yet fixed it). But a severed pull line is not something you want to happen underway when you cannot easily or safely reach your hands out to the end of the pole to detach it or you are forced to wrestle a pole on deck that is still gripped to your headsail sheet with a bad case of clench jaw.

2. Once you confirmed the pole and its moving parts are working great, take the pole out of its holster and lay it athwartship (or hold it in hand or in your lap, with preferably two crew) while you attach the fore and aft preventers at the opening behind the mouth at the outer end of the pole. You can then run the preventers out and back under the lifelines to their respective cleats if you would like, or let them fall free to the deck. As Phillip and I get better at this, I plan to have two preventers with lengths pre-marked so I know how far off to cleat them in advance. We attach our preventers to this opening (arrows below) behind the mouth of the pole, which is on both ends, where the topping lift also connects at the other end of the pole.


3. With one crew member holding the pole on deck, the other crew member will raise the end of the pole by pulling and cleating the topping lift for the pole. This is just an eyeball method to raise the pole roughly to the height of the clew of the sail. If you are single-handed, I imagine you could attach the pole to the mast and deck cleats to secure it temporarily for this step, then detach them after you’ve lifted the pole so you can then attach it to the sheet.
4. Loosen the sheet of the headsail so you will have enough slack to extend the pole out from the mast. (You can imagine how Phillip and I learned this one the hard way trying to wrestle that pole out. It was just inches from the mast and we were pushing with all of our might, a definite set-up for a slip and fall, before we realized we were fighting the sail itself.)
5. Attach the mouth of the pole to the working sheet of the headsail. Remember the Pam Wall rule: do NOT attach it to the clew of the sail. Attach it to the sheet. I usually have the pole extended about 2-3 feet over the side of the boat (with Phillip holding the other side near the mast), and I attach it to the sheet by setting the teeth (we’ll call them) on the sheet, then pulling the pull line from afar and the mouth then opens and drops down to snap around the sheet. My preventers, fore and aft, are attached at the time to that opening behind the mouth, and I am usually holding both preventers in my hands around the pole while I push it out. You can see in the photo below, the pole is locked around the working sheet of our jib, right behind the bowline knot. Our aft preventer has been computer-graphically inserted (as I mentioned we hadn’t yet learned to run one aft).

6. Then slowly push the pole out (running the preventers through your hand on the pole, if they are not pre-cleated, so they do not go overboard), until the other end of the pole reaches the mast.
7. Attach the other end of the pole to the ring at the mast.

8. Secure or trim your fore and aft preventers making sure the pole cannot hit the shrouds. I like to push my weight against the pole toward the stern making sure it cannot be pushed back and make contact with the shrouds, if so, I will tighten the forward preventer.

9. That’s it! You’re sailing under the whisker pole! Sit back and enjoy the no-luff-and-bang ride!
10. When you’re ready to disassemble, remember, if you would like, you can furl the sail under pole, leaving the pole (secure under its topping lift and two preventers), firmly in place and then disassemble the rig once the sail is secure. Or, you can disassemble the whisker pole rig with the sail remaining out by simply following the previous steps in reverse.

I was so happy when we got this thing rigged up, I did a dance. A pole dance.

Sorry, couldn’t help it. Yes, that is totally me. 100%. Every single rib. All 40 of ‘em. Yep.
Happy sailing folks!
Great info Annie, very informative!
Why thank you Sir Bacchus! Hope you two (nay three!) are enjoying your cruising!
Thanks for this one Annie. You speak from the heart. Makes me realize all this salty knowledge doesn’t just happen and we shouldn’t be ashamed of our learning curve. I have the pole and just like you have barely used it. Not anymore!
Thanks for the knowledge and stay safe during Hurricane season!
SV Ausdauer
Wow, what an awesome comment to receive here. We really appreciate that. Phillip and I certainly are no experts, but we do try to push ourselves at time to try new things and learn new methods of going about it, and we always like to share. Hope this helps you whip that pole out and go to it! Have fun out there, and hope you stay safe, too. I’m watching Beryl right now, bear down near some friends of ours in the ABCs. I do not like hurricane season. I do not like it at all! > : (
Save that last pole picture for a book cover it would be beautiful and perfect!!!!
Thank you for this amazing and thorough article – I have a question I’m hoping you can help with. It appears that your shrouds run fore and aft of your mast like The ones on my 1964 Pearson commander. Are you attaching the mast end of your whisker pole to a ring on your mast or to port and starboard rings on the fore deck – and if you are attaching it to a ring on the mast are you relying strictly on that fore guy to keep it from banging into the shrouds? Also it appears in one of the pictures-and this may be an allusion-that in one case you have the whisker pole mounted between shrouds-am I seeing this correctly?
Hey Scott. Thanks for following along and reaching out. I’m glad this post was helpful for you. As I mentioned in the article, for years we hesitated to use our whisker pole because we just didn’t know quite how to rig it right. But in the right conditions (a light, bumpy downwind passage) it makes a big difference. We attach our mast end of the pole to a ring at the mast. The pole sits forward of all shrouds (not in between them). We tie a preventer to the bow to keep the pole from swinging back and hitting the forward shroud. We also tie a preventer aft as well to hold the pole in place. When completely rigged, we have three lines holding the bitter end of the pole in place (the topping lift and two preventers running forward and aft). The aft preventer allows us to furl the head sail up through the pole, leaving the pole in place. Hope that helps you! Happy sailing!
Late to this post but so very happy to find it. after reading this I believe we are ready to set our whisker pole for the first time on our (non-furling) 130% genoa. If I’m reading this right we need three (3) lines on the outboard end of the whisker pole (a topping lift plus fore and aft preventers) in addition to the sheet running through the jaws. I think I’ll try to rig the forward preventer through a block attached to the bottom of the pulpit and running back to the cockpit and cleated-off so that any fine fore/aft tuning can be made with out going forward. Thanks again for the post!
Hey Bob! So glad you found the post and that it was helpful. That whisker pole felt like a big riddle for us for a long time. The three “rules” I mention in the article definitely cleared it up for us. And, yes, you are correct, we attach three (3) lines to our pole when rigging: 1) the topping lift to raise it; 2) a foreword preventer; and 3) an aft preventer. Good luck with it! Happy sailing!
why do you not rig the pole with the headsail completely furled and out of the way? I can easily handle my pole solo using this method.
The best answer? Because we were (are still?) novices. You’re absolutely right, Jeff. We have since learned setting up the pole (with the headsail furled and simply running the working sheet through the jaw of the pole) before unfurling the sail is much easier. It always nice to know, too, with the pole secure and independent of the sail, that we can furl anytime and just leave the pole out there. Appreciate your insight. Impressive you can do it solo. Kudos!