

Many props to our prop for hanging in there with us for so long (even though we were blind to her suffering!). We’ve been battling this problem for several years now and simply did not know what the underlying problem was. We did not know the “key” to the issue was the fact that the key kept coming out. Here’s what we were dealing with:
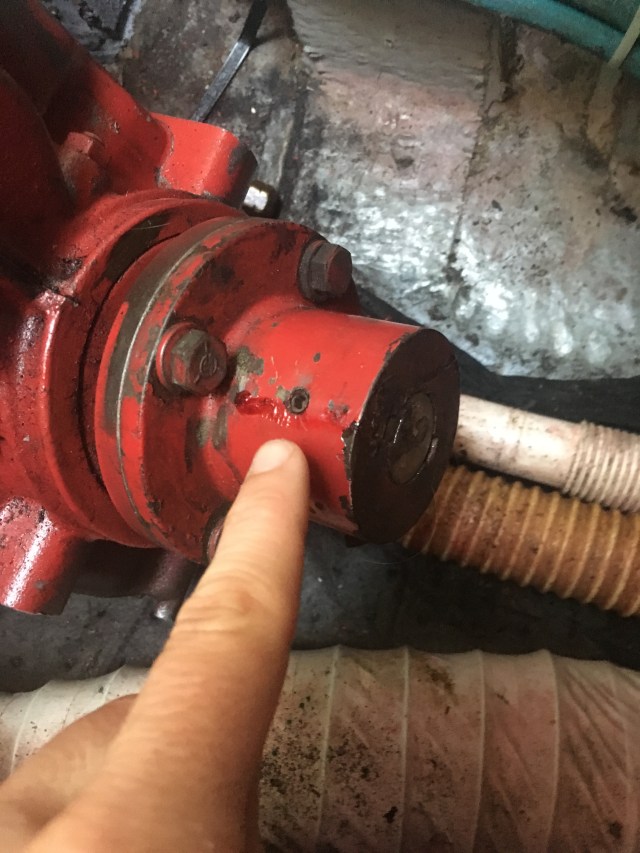
Our prop shaft and coupler both have a matching notch that fits a key which helps the shaft sit tight in the coupler so it can be rotated smoothly by the transmission. You can see the key here.

Yes, the one with the red goop all over it. That’s Loc-tite, what we thought would be the answer to this problem. You see, this key kept coming out. Phillip and I are pretty diligent (we try to be, at least) about checking on our engine. We always check the oil, transmission fluid, and coolant levels before starting. And, if we are motoring for a significant number of hours while underway, we try to make a habit of pulling back the sink (which gives us access to our engine) and checking on Westie as he is motoring along hour after hour.

We look for oil or coolant leaks, water leaks, any loose parts, etc. And, during our trip down to Cuba and our fantastic sails back up along the coast to Pensacola in early 2017, we noticed this key kept coming out.

Often we would find it halfway out, spinning around like a wild tea-cup ride at Disney, as the shaft was spinning. Or, we would find it spit out about six inches forward of the transmission into the bilge. Phillip and I would start to wager bets as we would be trucking along under motor and heading down to check on the engine: “Do you think the key is halfway out by now, or already spat to the bilge?” (Most times it was already jettisoned by the time we checked.)

Phillip and I knew this key issue was a sign that some bigger problem was likely the cause and that there was something going on that wasn’t right with our coupler or shaft. We just did not know what. I can’t tell you how many times we located and re-Loc-tited that sucker back in place. Dozens, if not more.

While this little key popping out might seem like a minor problem, we were worried, if it continued or worsened, the transmission could potentially lose the ability to turn the shaft. That would be a huge problem. So, the key was legitimately discerning. Our first thought was to have a new key machined that stuck out a little further past the end of the shaft, with a hole drilled through it, that would allow us to run some seizing wire through it to prevent it from coming out. That would solve the problem, right?
If that was the root problem.
As we continued cruising, to the Bahamas this past season in 2017-2018, and watching further changes occur with our prop shaft, we soon learned it was not.
Our first discovery: There’s a set screw for the key!
I’ll just have to admit, we did not know that. For whatever reason, each time we were checking and re-hammering in this stupid little key, we just didn’t see it, or if we did, we did not know it was a set screw for the transmission key. So, “Aha!” Moment No. 1 was making this discovery, finding the set screw had indeed rattled itself far too loose, and re-tightening him down onto the key to hold it in place.

And, of course, we goobed that guy up with red Loc-tite, too. That seemed to be our solution for many boat problems at the time. “Just Loc-tite it. It’ll never come loose.” Right, cause that’s how it works on a boat. Nothing ever rattles. Nothing ever breaks free. At the time, we were using the same method with the three nuts on the back of our rudder post cap underneath the cockpit floor and you now know, from our rudder post reinforcement post, we have since come up with a better-than-Loc-tite solution there as well.
When the set screw, much like the key had, started to break free from its repeated Loc-tite baptisings and allowed the key to continue to spin out, we knew we were going to have to do something else when we hauled out in 2018. At the time, machining a new key was the best conceivable answer. And, in the meantime, we just continued our “locate and Loc-tite” drill to get us back from the Bahamas to Pensacola to really troubleshoot and solve this issue.
But, then something funny started happening. Not only did the key continue to drift forward and come out. Toward the end of our Bahamas voyage, the shaft itself began to move forward. Yes, the shaft. This is not the best angle, but in this photo it is sticking about an eighth to a quarter of an inch out.

This movement of the shaft itself (not just the key) prompted Phillip and I to inspect the coupler further. We found the set screws on the coupler had also rattled themselves a bit loose, so that the coupler did not have a good tight grip on the shaft. Phillip tightened these down. This was during out trip back up the west coast of Florida on our way back from the Bahamas. And, to get us back home to Pensacola so we could haul-out and investigate this further, for good measure I cinched them down with seizing wire.
At least I thought I did. Turns out I’m not the best cincher. Or maybe it would be seizer … I’m sure I’d make one helluva Ceaser! But, knowing what I now know about how to run seizing wire (which I just learned from the boys at the yard – thanks guys!) I know this is a total useless loop. Hell, that design probably helps both screws loosen one another …

Way to go Seizing Wire Annie. Thumbs down. But, I can confidently say my seizing skills have since improved after we got a custom lesson from the boys at the yard. This is why we love working with them. I’ll show you the trick when we get the coupler issue figured out.
Cue the haul-out!


When the boys at the yard got their hands on our boat, they noticed several things immediately that were adding to our issues with prop shaft movement. First, they could feel and, actually with their hands alone, re-create the forward and backward movement of our prop shaft inside the coupler. Again, not the best quality video, but it was sent to us from Shane at the yard and you can easily see the movement of the shaft in and out with just Brandon below pushing and pulling it.
This was their first cue that something far more serious was going on with our prop shaft than a loose set screw on the transmission key. The boys could also feel that the strut had a little play in it, as they could physically move it from side to side—just a hair, but hairs can make a mess out of things offshore. They recommended it would be best to remove, clean, and rebed the strut for a more secure fit to the boat and tighter hold on the prop shaft.
That was a fun morning I spent unbolting that guy. Can you find the Annie in this picture:

Thankfully, I will say, almost every single part of our boat is accessible. While it may be uncomfortable and require the talents of an inconceivable contortionist, it is reachable. We can access, remove, and repair just about any part of our boat, because it was designed to do just that—be accessed, removed if need be, repaired if need be, and otherwise worked on! It’s one of the very great features of our boat. I was happy to find our four strut bolts were (with just a smidge of boat yoga) rather easily accessible right behind Westie on the engine room floor.


The shipyard guys, when they disassembled the strut, also noticed our cutless bearing was worn out. While this surprised Phillip and I as we had replaced that cutless bearing only a few short years ago in 2014, if you consider the amount of play we had in our prop shaft, and the number of miles we put under our keel while that play was occurring, it made sense.
Lastly, when Brandon removed our coupler, he found the coupler itself was wallowed out with the movement of our shaft and it simply (tightened down its full capacity) could not get a good grip on the shaft.

When Brandon removed both the prop shaft and the coupler from the boat, he showed us the movement he could exert with his hands on the shaft. Brandon explained the coupler should slide on and have an absolute snug fit with no movement. He and Shane also said we were lucky the shaft was going forward. This happened when we were in forward gear because the propeller is trying to work itself forward through the water. If we had backed down hard enough in reverse, the prop would have been working to move itself backwards through the water and could have worked its way right out of the boat with the condition our coupler was in. Now, I have a new boat nightmare. Thanks boys.
Here is a video of Brandon showing us the movement in the coupler and having fun at my expense. You will be surprised by the play in our coupler. You can hear it audibly in the video. You’ll also enjoy Brandon’s response to my joking that he had “purchase discretion up to $800.” “Oh, it’s $799 then. $799!” Gotta love those guys at the yard.
So, with this revelation, we were in for a re-bedding of the strut, a new cutless bearing, and a new coupler. But, if we were going to replace the coupler, we wanted to re-engineer it so the coupler would not allow the key to come loose or the shaft to try to move forward again after the many more miles we plan to put on our boat. For this reason, Brandon hired a local machinist to create a cap that bolts onto the end of our coupler to hold the shaft in place. He kept a window hole in the cap so we could see the shaft and visibly confirm its location in the coupler. The machinist also included a threaded hole in the center that we could use to twist a bolt down to pop the shaft out if it had, for whatever reason, seized up in the coupler. Overall, it was a better, stronger design for our boat and eliminated all movement in our prop shaft. Here is the new coupler!

And, fun little lesson for all you boat project fanatics today. Notice Shane’s method for fastening seizing wire in the photo above. While everyone can do it differently, I definitely liked his idea of purposefully routing the wire in a way where one bolt’s attempt to unthread and turn to the left would result in a tug on the other bolt toward the right, and vice versa. Meaning, as the bolts try to loosen themselves they are, in fact, tightening one another. Thanks Shane!

Little things like this can make all the difference out there on a two-week passage where you are working all systems so hard twenty-four hours a day. Phillip and I know we will sleep better and have more peace of mind knowing this system, too—our prop shaft, the coupler, the cutless bearing, and the strut—have all been inspected, re-mounted, secured, or re-engineered to be stronger and more stable for our rough passages.


This is the reason Phillip and I decided to devote the time and money this summer to haul-out and do these “mission critical” repairs and upgrades as we have some big cruising plans this fall. And, some big destinations to announce! We can’t wait to share our plans with you (you know, the ones written in sand at low tide ; ). But, next up, we’ve got some more cool shipyard projects to share with you. Hope you all are enjoying our boat labor this summer! You get to pick next week’s topic. Because:
I can’t make heads …

… or tails of it!

Would you like to see our swap to the composting head or re-painting of our Westerbeke engine. You decide. Leave your vote in a comment below!
Hi Captain Annie,
Now having a red engine will make you go faster.
also red gets pulled over for speeding more often! So watch out for coast guard boats!
Ha! That’s funny. Good to know. (As if we could “speed” in our sailboat … : )
Did you have the coupler lap fit to the shaft? Maybe I missed that in your write up.
Couplers are made just slightly too small and are enlarged by a machine shop with the shaft on hand to make sure it is a very very tight fit.
Hey there Capt. Ed. We sure did. We sent the shaft off with the old coupler to the machinist so he could make the new one and lap fit it to the shat. We also lap fit to the prop to the shaft too. Great question. Thanks for following along!
composting head
Ahh, a vote for the composting head. I think we have a tie! Thanks Bill.
Annie with all the parts mentioned if you could talk about a pickup truck and a dog we might have a country western sailing song all painted loctite red
Thanks for this article, Annie. Very informative and interesting (as usual). I don’t know whether to be impressed or traumatized by all the work you guys have put into your boat. Is all work I have yet to start? I’m hoping that fresh water and short Canadian seasons mean that I’m years away from needing most of the same repairs. Fingers crossed! And, add one more vote for painting Westie! Thanks